Creamed Corn

Have you been to Texas? I went to Texas for the first time a couple years ago and I was introduced to Rudy’s Country Store and BBQ. I don’t really go there for the BBQ though. No. Every time I’ve been back, I go for the creamed corn:

The creamed corn is an absolute must. To my dismay, there are no Rudy’s locations up north. So I’ve been trying to find the best substitute. And I did find a great copy cat recipe. It’s not the perfect replica, but it’s still quite tasty.

Creamed corn

Consider adding this to your Thanksgiving meal this week, or just have it for a weeknight dinner. It’s quick and simple.

Creamed corn

Ingredients:
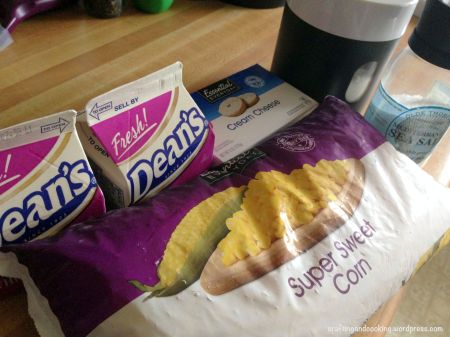
1 pint heavy whipping cream
4 oz. cream cheese
16 oz. frozen corn plus a little bit more.
2-3 teaspoons sugar
1 teaspoon salt
Black pepper

Creamed corn


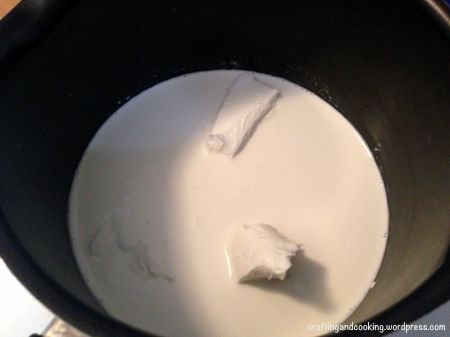
Put the pint of heavy whipping cream in a pot with the 4 oz. of cream cheese. I cut the cream cheese up a bit smaller. You’ll be melting it over medium heat until it melts. A whisk is best used to stir it as well.

Creamed corn


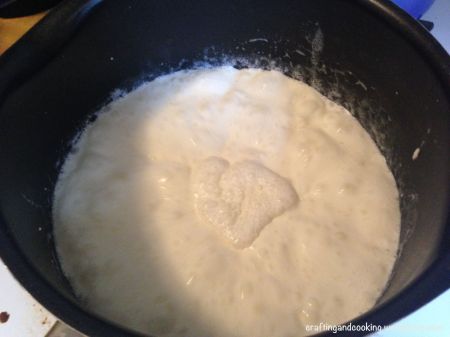
Let it boil for a little bit just to make sure the cream cheese is melted and it’s heated through.

Creamed corn


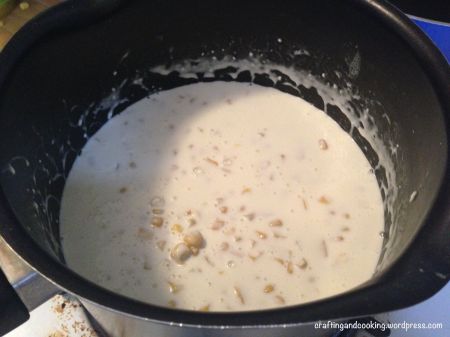
Add the corn, salt and sugar. And make sure the corn gets heated through. If it looks like there’s too much sauce/gravy, try adding more corn. Mine turned out a bit more soupy, but it was still good.

Creamed corn


Pour into your container to serve and sprinkle on the black pepper.

Creamed corn


Ready to eat!

Also, if you do find yourself at a Rudy’s, I love the brisket. And you need a buy a bottle of their Sissy Sause. I actually just ran out of the bottle I bought a few months ago. Tastes yummy on chicken.

Honey Beer Bread

I am not a fan of beer. I just don’t get it. The taste has just never appealed to me. However, beer bread? That’s something I can get behind. I never stock beer in my fridge, but I usually can snag a leftover bottle from a family party. This is the second time I’ve made this recipe (originally from gimme some oven) and it’s super tasty and filling.

Plus, it’s a no knead, no rise, no yeast dough. It takes no time to make!

Honey Beer Bread 6

Doesn’t that look delish? It’s a bread that can be eaten as a side to a savory meal or sweetened up for breakfast or a snack.

Honey Beer Bread 1

Ingredients:
– a 12 oz. bottle of beer
– 2 tablespoons of honey
– 3 cups flour
– 1 teaspoon salt
– 2 tablespoons sugar
– 1 tablespoon baking powder
– 4 tablespoons melted butter

Start by preheating the oven to 350 degrees and greasing a loaf pan. Then, whisk together your dry ingredients (flour, salt, sugar and baking powder).

Honey Beer Bread 2

Stir in the honey and the beer to make a dough ball.

Honey Beer Bread 3

Pour half of the melted butter into the bottom of the loaf pan.

Honey Beer Bread 4

Spread the dough into the loaf pan.

Honey Beer Bread 5

Pour the rest of the melted butter on top of the dough. Now, I put the loaf pan onto a baking sheet and then into the oven for about 50 minutes or until a knife stuck into the middle of the loaf comes out clean. Let it cool slightly then serve!

Honey Beer Bread 7

Ooo some melted butter and a drizzle of honey? So good. And check out how deliciously golden the bottom of the bread came out.

Baked Mozzarella Sticks

Please tell me I’m not the only person who sees mozzarella sticks on a menu and considers eating a plate or basket full of them for their main meal. It’s pretty simple to make some of your own with the help of good ol’ string cheese.

Baked Mozzarella Sticks 8

I’ve used string cheese before to add cheese to a meal, like with the pizza crescent rolls. A nice melty cheese.

Baked Mozzarella Sticks 0

Start by chopping up a bunch of mozzarella sticks in half. Take the sticks and put them into the freezer. I left them in there for a few hours. This helps keep the cheese from becoming a big cheese puddle.

Baked Mozzarella Sticks 1

I took bread crumbs, parmesan cheese and a packet of Italian salad dressing mix and stirred it all together. I would play with this mixture until you find the right breading combo. This ended up a bit on the salty side. I’d probably cut the dressing mix and the cheese down and add more breading.

Baked Mozzarella Sticks 2

Set up your station. One bowl needs some flour. The second bowl needs at least one beaten egg, depending on how many mozzarella sticks you will be making, you may need one more. Third bowl is your breading. And then you need your baking sheet with aluminum foil.

Preheat your oven to 400 degrees before you pull the string cheese out of the freezer.

Baked Mozzarella Sticks 3

Coat the stick with flour.

Baked Mozzarella Sticks 4

Then coat it in the egg.

Baked Mozzarella Sticks 5

Then cover it with breading.

Baked Mozzarella Sticks 6

Lay all your sticks out on the baking sheet. My sticks were really frozen. So I ended up baking them for 10 minutes, then flipping them and baking them for another 4 minutes. But if yours aren’t that frozen, they may only need 10 minutess total. You’ll need to watch them.

Baked Mozzarella Sticks 7


There we go. Nicely browned mozzarella sticks! Not too melty. Serve with some marinara sauce.

Buffalo tater tots

The inspiration for today’s recipe came from a photo gallery of tater tots that are available at Chicago restaurants. Buffalo tater tots. Sounded awesome… plus simple. And I think I was getting a message that I needed to make these. I stopped by the store, the bag of tots was $1.99 and everything else was on sale too.

Buffalo Tater Tots 4

Looks pretty good to me! May be a great appetizer for a game day of some sort.

Buffalo Tater Tots 1

Four ingredients: Tater tots, blue cheese dressing, blue cheese crumbles and buffalo sauce

Make the tots according to the package directions.

Buffalo Tater Tots 2

I poured a 1/2 cup of buffalo sauce over the tots. You have to make sure the tots cool slightly or a bit more stable. I tried stirring them, and that meant mashed tots.

Buffalo Tater Tots 3

I poured in some blue cheese crumbles and then drizzled the blue cheese dressing over the top. I’d suggest serving this with more buffalo sauce and more blue cheese dressing on the side. Also forks. Forks are good.

For more from Crafting and Cooking, head over to my Facebook page: www.facebook.com/CraftingAndCooking.

Three Cheese Tomato Tart

I love tomatoes. I’m someone who will eat a bowl full of grape tomatoes or cherry tomatoes with some salad dressing. I’ll go pick up bags of tomatoes from the farmers market, especially when they’re in season. I also love cheese. Love love love cheese. I have at least four different kinds in my fridge right now. Hey, I’m a girl from the Midwest, cheese loving is usually a requirement.

This tart is one of my faves. It’s an interesting alternative to pizza. I’ve brought it to potlucks, eaten it for dinner and had it for Sunday brunches. It’s a crowd pleaser.

All done!

Three Cheese Tomato Tart
Adapted from TheKitchn

Tomatoes sliced pretty thin. You could use plum tomatoes or a larger variety.
A sheet of frozen puff pastry
Mayonnaise
1/2 cup of shredded cheddar cheese
1/2 cup of shredded mozzarella cheese
Grated Parmesan cheese
salt, pepper

Thaw your sheet of puff pastry. Take your sliced tomatoes and put them on paper towels. Put more paper towels on top and lightly pat. You want to drain a bit of the liquid out. While you’re doing this, make sure you preheat your oven to 375-400 degrees.

Use parchment paper or put the puff pastry on a lightly oiled baking sheet. Don’t use aluminum foil unless you’re sure it’s nonstick, otherwise you’ll have bits of foil stuck to the bottom of your tart. Poke your pastry with a fork so it won’t puff up.

Spread a thin layer of the mayonnaise on top of the puff pastry. This added a little bit of tang to your tart. Apply your cheeses in a uniform fashion on top of the mayo layer. Then take your tomatoes and place on top of the cheese. Season with salt and pepper. Then add your grated Parmesan cheese on top.

All the ingredients put together before baked.

Bake for about 30 minutes or until the cheese browns. Then serve.

Mandy‘s Recipe Box

Creamed corn casserole

I love creamed corn casserole. I seriously do. Whenever it’s served, I find myself piling more corn casserole on my plate than whatever meat or entree is being served. I’ll be greedy about it too. I could eat it for breakfast, lunch, snack and dinner. That’s how much I love it. 🙂

I usually buy the cream corn casserole pre-made. But my usual supplier has decided it’s a seasonal dish, only for the holiday time. Not cool. But it’s a really simple recipe. It’s basically the same as corn muffins from a box, but it needs to be a little more liquid. So that comes from the creamed corn.

The ingredients for Creamed corn casserole.

Before it goes into the oven

Finished Creamed corn casserole.

Yum, creamed corn casserole on the plate.

Ingredients:
8 oz. of cornbread mix
1 can of corn, drained
1 can of creamed corn
2 eggs, beaten
1 cup sour cream
1 stick of butter (1/2 cup)

Mix all the ingredients together and then pour into your baking dish. The mixture will be soupy. Stick it in the oven for 50 minutes. The top should be golden brown.

That’s it. Seriously. Simple recipe, you probably have all the ingredients at home. I only had to run out for the regular can of corn and the cornbread mix, since I only had blueberry muffin mix. You could probably use frozen corn thawed out slightly instead of the can too.

There are people who like a cheesy creamed corn casserole. I’m not really one of those people. But just sprinkle the cheese on top and bake for another 5 minutes or until it’s melty.

Mandy‘s Recipe Box